Summer Separates…. An impromtu clothing line.

I rolled out some clothing on my ETSY site this last week.  I ‘ve got an “in” with a beautiful line of silk taffeta that has been fun to flirt with and these fabrics definitely tickle my feminine fancy because some dresses are next!  The current collection of separates I just put up mixes this silk taffeta (washed to soften) with hand dye linen and lace tank tops for super comfortable and easy to put on pieces that have a summer boho feel.   All of the skirts have fantastic wide elastic waistbands  are lined in rayon.  All of the pieces are washable.  Not bad pictures for being in my basement.  Also…  I have been asked to do a fashion show here in Georgetown, Seattle, USA.  I will let you know if I participate.  Sometimes these things are not what they seem and that is why I am still on the fence.

Making Fascinators

I have been straight up sewing like a storm!!!!  Now I need to finish sewing and finish taking pictures of it all to 1) sell it on my etsy site and 2) Show all of you what I have been doing.  But here is a sneak peak because I can’t resist.

It all start with fascinators… I can’t stop making them.  And then in order to take the pictures (in my head) of them I want to make crazy party clothing to go with all of the fascinators.  So I am working on a mini bridal collection of some mix and match separates, a couple “bridesmaid”/party dresses and, of course a simple silk wedding dress.  Yeah, it’s ambitious…. but all of the separates (washed silk taffeta skirts and hand- dyed linen tank tops) are done and the bridesmaid samples are partially done.  That just leaves the wedding dress.

Once it is all done I am going to put my huband in his three piece, voluteer my friends for the wedding party and take some mock wedding picture of the whole shibang .  Yeah, no, not ambitious at all.

OK so I did take some pictures of the fascinators kind of to scout out the a location for my bridal shoot, and kind of spontaneously because my friend Taz, talented photographer had time to work with me.

WOW…. has it really been since November?

So obviously I have been ignoring this here blog.  Soooo Sorry!

Here is what has been taking precedence:

http://www.coyotecentral.org/

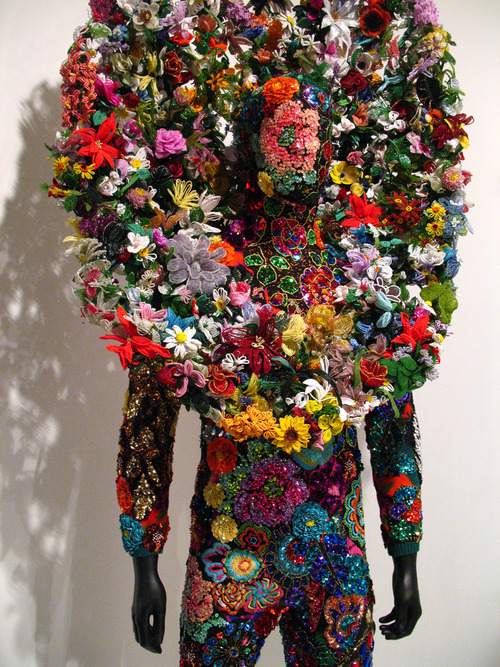
I have been teaching a design, sew and embellish class for middle school students.  We have been doing lots of sewinging.  I will also be having a workshop for “Nick Cave inspired” art in conjunction with an exhibit of his work at the SAM called “Meet Me at the Center of the Earth”.  I am really excited about this and have become quite a fan of Nick Caves work and those of you who know me can probably see why:

I will keep you posted on how our own Soundsuit inspired art goes.  One of these days I will actually take pictures of my class and how much fun we have for you as well!!

I have also been sewing:

I made this dress by quilting recycled leather,  recycled wool and silk for the bodice with silk organza skirt.  There is a fully boned corset inside and a heavy exposed zipper down the back.

I am also costuming a play for Theater Schmeater here in Seattle.  It is The Twilight Zone 2011.  I am really getting my Mad Men fix off of this one.  It opens on March 18th and it is sure to be a fun time!!  We are doing three episodes:

The Obsolete Man

Time Enough At Last

The Monsters are Due on Maple Street

And it is going to be done pretty much to that late ’50s early ’60 feel even for Obsolete Man which is set in the future.

Stay Tuned!!

SteamCon 2010- I am not a convention virgin any longer

So before we get to SteamCon, mom wants  to see Halloween Pictures.  So drum roll please:

This slideshow requires JavaScript.

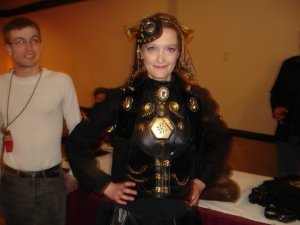
So this last weekend I attended SteamCon 2010 a convention for Victorian Science Fiction and all things that revolve around this concept from clothing to l.a.r.p. ing* and all thing between.  I went to model in a fashion show for the afternoon tea party, for Tamara Lily and Marie Cooley .  Here is my analysis:

1. us geeks are freaks. 2. really awesome costumes. 3. geeks know how to party… all night long (I think, I went to bed).  4. REALLY AWESOME COSTUMES!

This is what I made for my self to wear. The jacket is an actual Edwardian jacket I just hand stitch some steampunk trinkets to.

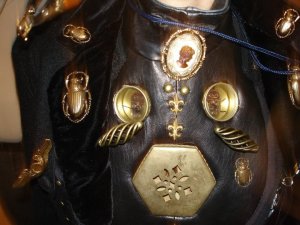
Here is AnamoAng the Victorian Cyborg's cheast plate. All recycle leather.

I was in the fashion show both days so did not have a huge amount of time to run around but the Art Exhibit was cool and Mercantile gave me tons of ideas a churnin’.

Here is the reel from the fashion show on FLICKR.

*live action roll play

FREE- pattern… pleated skirt with exposed zipper and grosgrain.

sailor skirt with pocket

I call this the math skirt.  This skirt is fun and easy with sweet detail like ribbons and lace.  It can be the perfect plaid school girl skirt or if its done in denim or corduroy yer cowgirl skirt. It could be a great summer skirt in an eyelet (lined, of course) or a winter wool staple with tights.  Any way you sew it- this little equation will be sure fire PROOF!

Fabric:

1 1/4 yard of fabric

THE MATH:

Waist Measurement _____ + 40″ = __________ /2 = ___  (width)

(Example: Waist 32″ + 40″= 72″/2 = 36″).

Other Supplies:

18″ separating zip (I coordinate this with my fabric)

2 1/4 yards of 1/2″ ribbon

4 1/2 yards of 1″

waist + 4″ of wide single fold bias tape or 1″- 1 1/4″ wide grosgrain ribbon for waist facing

Zipper foot

Wash fabric, ribbon and lace if the skirt is going to be washed after it is sewn.

CUT:

Cut two rectangles that are width measurement from above x 20″ long.

STITCHING THE DARTS:

At the center point of the top edge of these rectangles, chalk a 4″ line on the back side of the fabric perpendicular to the grain line.  Measure 1″ to each side of this line and clip a notch in your fabric.  Line up your notches and stitch from notch to the end of your chalk line to create a hip dart. Press flat lining up center line with stitched line.

STITCHING THE FRONT:

Mark center front and center back on each rectangle.  Find the mid point between dart and CF and notch. Pin and stitch a 1″ deep and 9″ long pleat at this notch.  Open and press this pleat flat aligning the notch and stitching to create a box pleat.  Find the midpoint between the dart and the pleat and notch.  Repeat the steps to create the box pleat.  Find the mid point between CF and your original pleat, clip, stitch and press another pleat here.  There should be three box pleats between the side dart and the center front on each of the rectangles.

STITCHING THE BACK:

Finish both CB with either a zigzag or a serger.  Stitch center backs together (careful to line up waistlines and hemlines) with a 1/2″ seam allowance.

Measure 2″ in along waistband from the CB seam and notch.  From this notch measure another 3″ in and notch.  Continue measuring 3″ in toward the side dart until you have 5 notches.  Create a 1″ deep 9″ long box pleat using the method described above at each of the notches.  When you are finished there should be 10 pleats between the two side darts. Press all darts… again.

Note: Now is a good time to fit this garment to you.  Wrap it around yourself and adjust the fit at the center back and at the side darts if necessary.  Remember there is 1″ seam allowance at the center front.

Baste waist edge of skirt securing all pleats and darts.

ZIPPER

Fold and press 1/4″ of the center front toward the wrong side of the fabric.  Fold another 1/2″  and stitch  first fold into place finishing the raw edge.  Pin zipped zipper on top of the hemmed center front of skirt aligning the top of the zipper tapes with the waist edges and the center front hemmed edges.  Hand baste the zipper to the skirt to ensure it won’t move while machine stitching.   Unzip zipper (make sure it glides smoothly with out catching your basting.)  Here you can experiment with stitches like using a zigzag or a feather stitch while you are machine stitching the zipper into place.   Continue stitching past the end of the zipper to the hemline.  Note- there is a plastic coated section of zipper tape at the end of the zipper teeth that I some times have to hand crank my needle through.  Remove hand basting after zipper is secure.

FINISHING-

Waistline-  Stitch ribbon or bias tape on top of the waist edge at 1/2″ (wrong side of ribbon/tape to right side of skirt) leaving 1″ on each end.  Fold tape toward the back of the skirt and press this facing into place tucking in the ends of the ribbon under the facing trimming of necessary.  Stitch ribbon or bias tape to wrong side of skirt to secure the facing.

Hemline-  Finish bottom edge with a zigzag or serge.  Fold up 1″, press and stitch hem.  Stitch decorative ribbon over this hem stitching.  Using a long stitch on your sewing machine, gather the lace up enough to fit the bottom edge of the skirt. Edge stitch skirt hem on top of the gathering stitch on the lace to attach.

POCKET-

I did not use a pattern for the pocket.  I just started cutting into some scraps until I had the shape that I wanted (Yes, you can too!!)

More from the embroidery front.

I have been quite busy this last month- costumes for boylesque, pillows for wThe Wedding Pantry , a bridal shop in LA ….  the pillows are on my ETSY site as well, 60th birthday present for my mom (don’t worry there is no spoilers here).  Fosse Jack (boylesque) is performing tonight at Neighbors– featuring costumes by me.  Doors open at 8:30 and there is a $10.00 cover.

And it continues…. I am starting a wedding dress for my friend Michelle.  It is just a cute 1950’s inspired white silk dupioni with deep teal Mums embroidered on it (not by me).  I think it will be fun… and not to bridaly (ick).  Speaking of Bridal, there are new pillows up on my Etsy site now .  Take a look and enjoy!

PS- I am SOOOO excited about my Moms present…. its gonna be REAL good!  It is hard not to share but seeing as my Mom is like my only loyal fan, it would not be worth spoiling.

Hat making and other obsessions.

repro velvet flowers

My mom has informed me that she does not like looking at my anthro rant any longer (I swear… and she does not like it).  So I am changing it… happy??

I have been taking hat making classes from a really excellent milliner, Izzie Lewis.  We started with covering buckram forms with fabric and then graduated to blocking fur felts.  Dave now has a running joke because all I can think about now is hats- when we watch movies, walking down the street, while we’re eating, when he is talking it’s coming out as hats,hats,hats- hats hats hats, hats?  I reply hats, hats,hats hats hats.

I know there are people out there (besides my mother) who have waited for this post as well.  Sorry I’ve taken my sweet time.  I have been learning a lot about taking pictures and also Photoshop.  I have been doing this online couse on Photoshop over at Lynda.  I have learned quite a lot in a very short amount of time.

Here are the hats I have worked on:

buckham cover with wool.

This was blocked in 2 parts- crown and brim.

This is grosgrain gathered into a crazy 8 with two 1940's buttons.

I also made hats for my father and my brother for christmas:

This fur felt was blocked all in one.

All of these hats have a wire in the brim and head size ribbons on the inside.

WARNING-Anthropologie RANT… Go ANTHRAX!

So cute..... and yet such a race to the bottom!

So cute..... and yet such a race to the bottom!

So it’s not like I have tons o’ time to shop…. I definitely do more sewing but I occasionally get gift cards and I currently have one for Anthropologie, so naturally I get the catalogue.  Beautifully photographed, perfectly styled and designed in the way that makes you want it all.  I think that it is fucked up that items in this catalogue A) do not have fiber content-you have to go to the web for that where there is a convenient Buy Now Button (even there it’s hard to find), and B) either says imported (mostly used), made in the USA, or made in COUNTRY X if it is an ethically acceptable country to have clothing manufactured in.  Does this really fool people????  What the hell does imported mean to Anthropologie ??  I think it is a disgusting way to have cheap manufacturing in countries that have known human right abuses and quality issues in their manufacturing.  They are disguising practices that do not measure up to the American public demand for some ethics in Globalization.  Since Anthropologie dose not want to use terms like Made in China (which I bet is the truth for 85% of the “imported” things in their catalogue) they mask this in the term imported.  Fucking Redonkulous!!

Catch me if you can- this costume rocked!!

Here are some stills of the Flight Attendant costume I recently made and posted about here.  It is for a web commercial for Expedia… I don’t know much more about it except that I had a lot of fun doing it and would love more work like this 😉   I guess if this goes over well they will use this character for more of an ad campaign.